We may get the shapes right, the colors right, and yet the sketch looks flat, why? Objects need context for them to make sense to our brain. Here are few tools to help add depth and dimension to your sketches. You may not use them all in every sketch but knowing they are there gives you tools to draw from.
I will build a simple sketch, showing how each techniques adds to the sketch, it is not necessarily the sequence I would use in real life, so feel free to adapt as you see fit.
Here is a tree. Shape and color tells me it is some kind of fir tree, that is fine as far as it goes, but lets see how to make it better.

Look what happens with just one simple line, the horizon.

Now instead of just floating in space the tree begins to feel like it is touching the earth. If we add some background, in this case distant hills, notice how the tree seems to move forward.
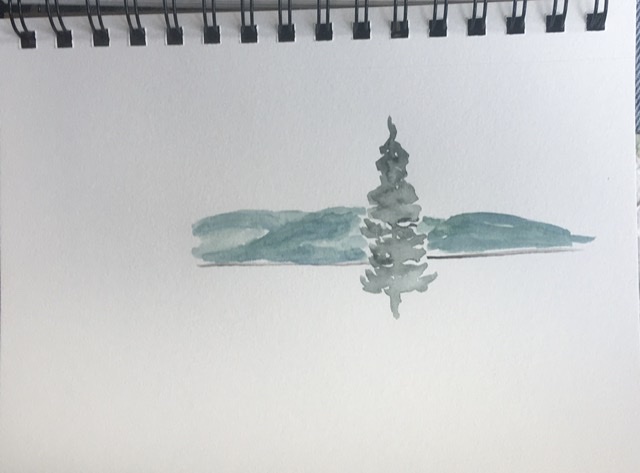
Because we are giving our eyes and mind some context the tree starts to make sense. Now add a bit of detail around the base of the tree, showing that it really is attached to the ground, and add a bit of color to the sky to make it all stand out. It is starting to look more like a scene than a floating tree.
So far we have:
- Added the horizon line
- Showed background hills
- Loose details at the base of the tree
- A bit of color and texture to the sky
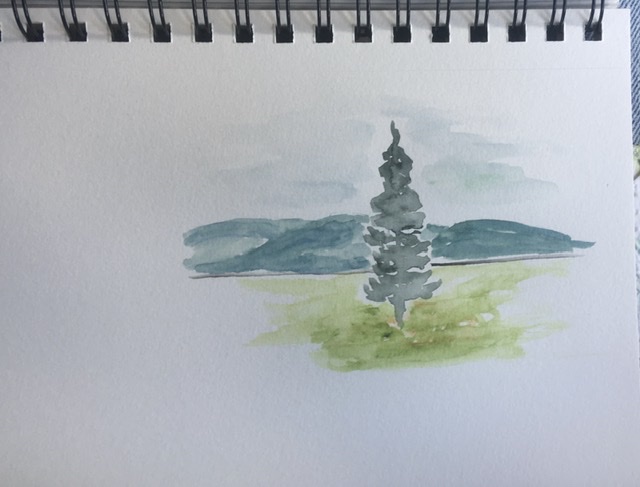
However we need to do more. Right now the tree is flat because it is all one color. We need to tell our mind that the tree is round, we do that by shading. In reality there are times when we will observe objects that are the same color all over, to sketch it that way makes for a really boring sketch. The side away from the sun in always darker. So lets add some color to one side fo the tree. Shade and shadows can be daunting for the best of painters, for us travelsketchers often just a second coat of the original color will do the trick. With buildings remember that one side is always a bit darker, it shows perspective, and if the sun is coming from the left, then the right side of everything will need to be a bit darker.

If we stopped now the sketch would remind us of when we were there, a perfectly satisfactory job of capturing the moment. But let’s show what happens when we take it a couple fo steps further.
One way to enhance our original tree is to add more in the foreground, other objects that give us even more context. How about a tree much closer to where we are standing? If there is no such tree and we want to stick with the reality of what is there, then a shrub, or a rock, or a flower will do the trick. Notice how the tree in front is greener. Also note how it pushes the mountains farther away, more depth.

Look what a fence can do to show us the distance and depth of the sketch, along with using our Micron for some texture in the grass.

I am sure this is some wonderful field in Central Oregon, where we stopped to have a picnic on the way to Bend. Well at least it sounds good, even though I conjured up the image in my mind.
So to recap. Whether the object is a tree, a building, or a cup on the table, even a bit of context gives the sketch depth. Use whatever works:
- Horizon
- Background
- Sky
- Foreground details and colors
- Objects that allow mind to compare. A closer tree, the fence, flowers, etc.
Give it a try and post some of your sketches on Instagram #theTravelsketcher, post on my Facebook page, theTravelsketcher.
Keep sketching,

Hey, nice mini-lesson my friend. I enjoyed that.
LikeLike
Might turn you into an artist yet
LikeLike
This is SO helpful! From one teacher (not art) to another (art master)—you are good! Thank you
LikeLike
With students like you the job is easy,
LikeLike
Terry, I love this! Both the teaching tip and the sketch.
LikeLike